
The reverse lunge is a lower-body exercise that strengthens the legs, hips, and glutes while also challenging balance and coordination. Instead of stepping forward like a traditional lunge, you step one leg backward and lower your body toward the floor. This movement pattern can feel more controlled for many people and is easy to modify for different fitness levels.
Reverse lunges can be performed with body weight, dumbbells, kettlebells, or other resistance depending on your strength and goals. They are commonly included in strength programs because they train one leg at a time while encouraging hip and knee control. Learning proper form, progression, and common mistakes can help you use the exercise more effectively and comfortably.
What Is a Reverse Lunge?
A reverse lunge is a unilateral lower-body exercise performed by stepping one foot backward while keeping the other foot planted in front. You then lower both knees until the front leg supports much of the working load. After reaching a comfortable depth, you press through the front foot and return to the standing position.
Unlike a forward lunge, the reverse variation begins by moving away from the planted leg. This can make it easier to control where the front knee travels and how quickly body weight shifts. Many beginners find reverse lunges easier to learn because the planted front foot remains stable throughout most of the movement.
The exercise can be used for strength, balance, mobility, and general conditioning. It trains each leg independently, which can help identify noticeable differences between sides. Reverse lunges also fit easily into home workouts, gym routines, warm-ups, and lower-body strength sessions because the basic version requires very little equipment.
What Muscles Do Reverse Lunges Work?
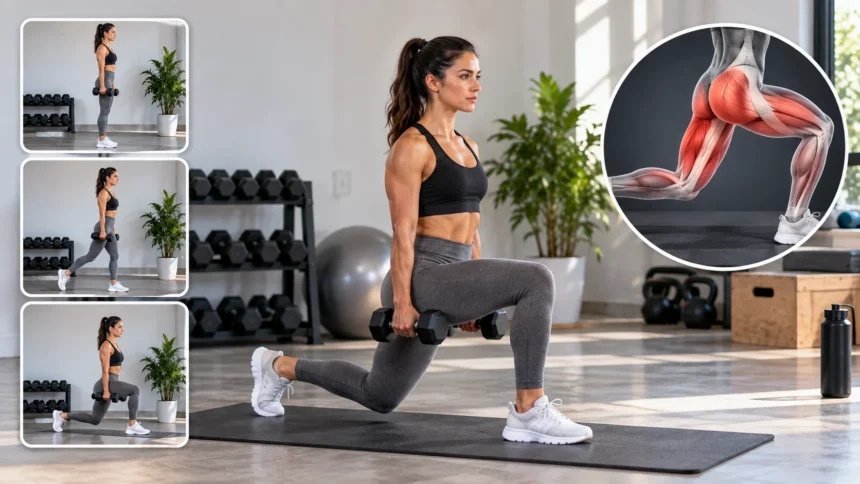
Reverse lunges primarily train the quadriceps, gluteus maximus, and hamstrings. The front leg performs much of the work as you lower and raise your body, while the rear leg helps with balance and positioning. The exact emphasis can change depending on stride length, torso position, depth, and the amount of resistance used.
The gluteus medius and other hip stabilizers also contribute because they help control the pelvis and keep the front knee aligned. Your calf and ankle muscles support balance while the core helps stabilize the trunk. This makes the reverse lunge more than a simple leg exercise because several muscle groups must coordinate throughout the movement.
Longer steps may increase the demand on the hips and glutes, while shorter steps can place more emphasis on the front knee and quadriceps. Neither option is automatically better, and the right position depends on your mobility and goals. A comfortable stride that allows good balance and joint alignment is usually the best starting point.
Benefits of Reverse Lunges
One major benefit of reverse lunges is unilateral leg strength. Because each side works independently, one leg cannot completely compensate for the other as easily as it might during a two-leg exercise. This can help improve side-to-side control and make the exercise useful for athletes and general fitness routines.
Reverse lunges can also improve balance and coordination. Every repetition requires you to step backward, control your body while lowering, and return to standing without losing alignment. These demands challenge the hips, ankles, and core while strengthening the primary muscles of the lower body.
Another benefit is versatility. Reverse lunges can be made easier with support or more challenging by adding weights, increasing range of motion, or using variations. They can fit into strength, mobility, athletic, and functional training programs without requiring specialized equipment or a large training space.
How to Do a Reverse Lunge Correctly
Stand upright with your feet around hip-width apart and your weight evenly distributed. Keep your chest comfortable, your core lightly engaged, and your arms positioned wherever they help you balance. Take a controlled step backward with one foot while keeping the front foot firmly planted on the ground.
Bend both knees as you lower your body toward the floor. The rear knee should move downward while the front knee remains generally aligned with the foot. Lower only as far as you can maintain control, then press through the front foot to bring the rear leg forward and return to standing.
Repeat the movement on the other side or complete all repetitions on one leg before switching. Move slowly enough that you can control each phase instead of dropping quickly into the bottom position. Good technique matters more than depth, speed, or the amount of weight you are holding.
Proper Reverse Lunge Form
Your front foot should remain firmly planted throughout the exercise. Try to keep pressure distributed across the heel, ball of the foot, and toes rather than shifting entirely onto one area. A stable foot creates a stronger base and can help you control the knee and hip as the body moves up and down.
Keep your front knee tracking in roughly the same direction as your toes. It does not need to remain perfectly vertical, but it should not collapse dramatically inward. Allowing the knee to move naturally while maintaining control is usually more important than following rigid rules about exactly where it must be positioned.
Your torso can lean slightly forward from the hips while remaining controlled. Excessively arching or rounding the spine is unnecessary, and you should avoid twisting toward one side. Think about keeping your ribs and pelvis reasonably stacked while the legs perform most of the movement.
Common Reverse Lunge Mistakes
One common mistake is stepping too narrowly, which can make the exercise feel unstable. If both feet land almost on the same straight line, balancing becomes more difficult. Stepping slightly outward as well as backward can create a more comfortable base while allowing the hips and knees to move naturally.
Another mistake is pushing mostly through the back leg when returning to standing. The front leg should perform much of the work during a standard reverse lunge. Think about driving through the planted front foot rather than using the rear toes to launch your body forward.
Moving too quickly can also reduce control. Rapid repetitions often cause the front knee to wobble, the torso to shift, or the rear foot to land inconsistently. Slower movement gives you time to maintain alignment and makes it easier to recognize when fatigue begins affecting your technique.
Reverse Lunge vs Forward Lunge
The main difference between reverse and forward lunges is the direction of the stepping leg. In a forward lunge, you step ahead and then absorb your body weight as the front foot lands. In a reverse lunge, the working front foot remains planted while the opposite leg moves backward.
Reverse lunges may feel easier to control because you do not have to decelerate the body after stepping forward. Many people also find it simpler to maintain balance and front-leg alignment. However, both variations can be useful when they are performed with appropriate technique and matched to the person’s comfort level.
Forward lunges can place different demands on coordination and deceleration, while reverse lunges often emphasize controlled lowering through the planted leg. Neither exercise is universally superior. The best choice depends on your goals, experience, mobility, balance, and how your knees and hips respond to each movement.
Reverse Lunges for Beginners
Beginners can start by performing reverse lunges while holding a wall, chair, or stable surface. Light support reduces the balance challenge and allows you to focus on learning the stepping pattern. As confidence improves, gradually reduce how much assistance you use rather than immediately adding weight.
You can also reduce the depth of the lunge if lowering close to the floor feels difficult. A smaller range of motion still allows you to practice hip, knee, and ankle control. Over time, you can gradually increase depth as long as the movement remains comfortable and your balance stays steady.
Gentle flexibility work may also help people who feel restricted during lower-body exercises. A broader mobility routine can include resources such as stretching exercises for seniors when an accessible approach to flexibility and movement is appropriate. Mobility work should support strength training rather than replace it entirely.
How to Add Weight to Reverse Lunges
Once bodyweight reverse lunges feel controlled, adding resistance can increase the strength challenge. Dumbbells can be held at your sides, which is usually one of the simplest weighted variations. Start with a manageable load that allows you to maintain the same stride, balance, and movement quality you use without weights.
A kettlebell or dumbbell can also be held close to the chest in a goblet position. This changes the way the load is distributed and can make it easier to keep the resistance centered. Holding weight at the chest may also increase core involvement as you control the torso during each repetition.
More advanced lifters may use a barbell, front rack position, or other loaded variations. These options require greater balance and overall strength, so they should be introduced gradually. Increasing weight only makes sense if you can maintain stable foot placement, controlled knee movement, and consistent depth from one repetition to the next.
How Many Reverse Lunges Should You Do?
Beginners can often start with two or three sets of approximately 8 to 12 repetitions per leg. This range provides enough practice without requiring extremely high volume. If balance or technique deteriorates before completing the planned repetitions, stop the set and rest rather than forcing poor-quality movement.
For strength-focused training, you may use lower repetitions with heavier resistance once your technique is reliable. For muscular endurance or conditioning, moderately higher repetitions can be appropriate. The exact number depends on your training goals, available equipment, and how reverse lunges fit alongside squats, deadlifts, step-ups, and other lower-body movements.
You do not need to perform reverse lunges every day to benefit from them. Two or three lower-body training sessions per week are enough for many people, depending on total exercise volume. Muscles and joints need time to recover and adapt, particularly when you are using challenging resistance.
How to Make Reverse Lunges More Challenging
The simplest way to increase difficulty is to add resistance. Holding dumbbells or another appropriate weight requires the front leg to produce more force during the return to standing. Increase resistance gradually rather than making large jumps that cause your balance or technique to deteriorate.
You can also increase the range of motion by performing deficit reverse lunges from a low platform. This allows the rear knee to travel farther downward and can increase the challenge through the hips and legs. However, additional depth requires adequate mobility and control, so it is better suited to people who already perform standard reverse lunges comfortably.
Another progression is to combine the reverse lunge with a knee drive or other controlled movement at the top. This increases the balance requirement and may be useful for athletic training. More complex variations should only be added when the basic exercise feels stable because complexity does not automatically make an exercise more effective.
Reverse Lunges for Glutes and Leg Strength
Reverse lunges can be very effective for glute development when performed with sufficient range and resistance. Taking a comfortable step backward allows the front hip to flex as you lower, creating a meaningful challenge for the gluteus maximus. Pressing through the front foot then requires the hip and knee muscles to extend the body back upward.
The quadriceps are also heavily involved because they help straighten the front knee during the upward phase. This makes reverse lunges useful when you want to train the glutes and thighs together rather than isolate one muscle. The hamstrings contribute as well, particularly around the hip and during stabilization.
For muscle growth, consistent progressive overload is important. Gradually increase resistance, repetitions, or total training volume while maintaining controlled technique. Combining reverse lunges with squats, hip hinges, step-ups, and other lower-body movements can create a balanced program that strengthens the legs through several different movement patterns.
Reverse Lunge Safety Tips
Warm up before demanding sets, especially when using heavier resistance. A few minutes of walking, cycling, bodyweight squats, or gentle leg movements can help prepare your joints and muscles. You do not need an exhausting warm-up, but moving through comfortable ranges before loading the exercise can improve confidence and movement quality.
Wear stable footwear and perform the exercise on a surface that is not slippery. Because you are stepping backward without continuously watching your rear foot, make sure there is enough clear space behind you. Remove objects that could create a tripping hazard before beginning your set.
Stop if you experience sharp pain, sudden weakness, or a feeling that the knee or hip is giving way. Normal muscular effort is expected, but significant joint pain should not be ignored. Persistent symptoms may require exercise modification or assessment by a qualified healthcare or rehabilitation professional.
When to Avoid or Modify Reverse Lunges
People with recent knee, hip, ankle, or lower-back injuries may need to modify reverse lunges or temporarily use another exercise. The appropriate choice depends on the injury, recovery stage, and advice from a healthcare professional. A shorter range of motion or supported variation may sometimes be more comfortable than a full-depth lunge.
Balance limitations can also make reverse lunges difficult. Holding onto a stable surface can reduce the risk of losing balance while still allowing the legs to work. Split squats may be another useful alternative because both feet remain in place rather than requiring a backward step during every repetition.
Pain should guide modification rather than being treated as something that must always be pushed through. Mild muscular effort is normal, but sharp or worsening joint pain is not the goal of strength training. Choose an exercise variation that allows you to work the muscles while maintaining comfort, stability, and control.
Conclusion
The reverse lunge is a versatile lower-body exercise that strengthens the glutes, quadriceps, hamstrings, calves, and hip stabilizers. It also challenges balance and coordination while allowing each leg to work independently. Because the front foot remains planted, many people find the movement easier to control than a traditional forward lunge.
Proper form involves stepping backward into a stable position, lowering both knees under control, keeping the front foot firmly planted, and pressing through the front leg to stand. Avoid stepping too narrowly, rushing repetitions, or relying heavily on the rear leg. Start with body weight and add resistance only when your technique remains consistent.
Reverse lunges can fit into beginner, strength, athletic, and general fitness programs. They can be modified with support, reduced range, or lighter resistance and progressed with heavier loads or advanced variations. Consistent practice and gradual progression are more important than immediately trying to perform the deepest or heaviest version possible.
FAQs
What muscles do reverse lunges work?
Reverse lunges mainly target the quadriceps, glutes, and hamstrings while also involving the calves, hip stabilizers, and core. The front leg performs much of the work during a standard repetition.
Are reverse lunges better than forward lunges?
Neither is automatically better. Reverse lunges may feel easier to control for some people, while forward lunges provide a different balance and deceleration challenge. Both can be useful in a balanced program.
How many reverse lunges should beginners do?
Beginners can start with two or three sets of around 8 to 12 repetitions per leg. Use a comfortable range and stop the set if balance or technique begins to noticeably deteriorate.
Can reverse lunges build glutes?
Yes. Reverse lunges train the gluteus maximus along with the quadriceps and hamstrings. Using a suitable stride, controlled depth, and gradually increasing resistance can make them effective for developing lower-body strength.
Should my knee touch the floor during a reverse lunge?
Your rear knee does not need to touch the floor. Lower only as far as you can comfortably control while maintaining balance and good alignment through the front foot, knee, and hip.